User’s Guide
Using the Camera Panel and Control Bar
Readout area is always specified in un-binned coordinates. Binning is applied to the data read from the readout area.
Using the Scan Panel and Control Bar
Using Video Panels and Control Bars
Synchronized Acquisition (aka Spectrum Imaging / 4D Acquisition)
Synchronized acquisition is camera acquisition synchronized with scanning. Specific examples include spectrum imaging and 4D STEM.
Your system must be configured properly for synchronized acquisition. This may include physical triggering connections between cameras and the scan device. It may also include software connections to route the trigger connections.
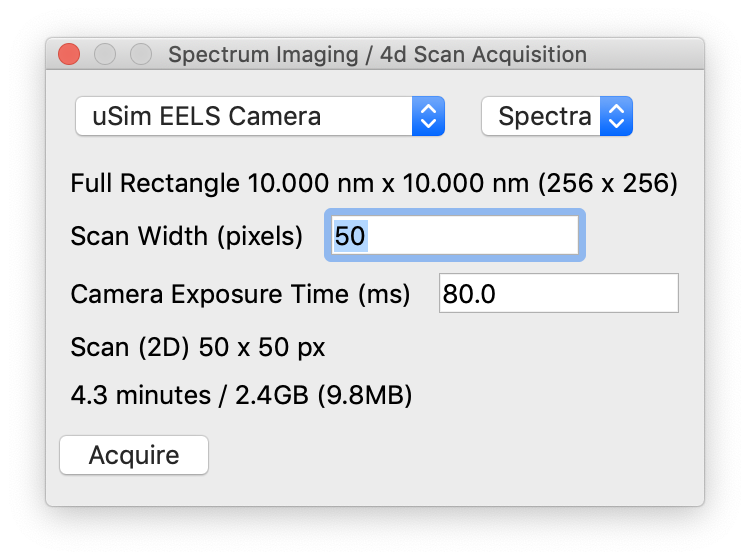
To use synchronized acquisition, open the Spectrum Imaging / 4D Scan Acquisition panel using the Window menu.
Next, establish a context image by performing a scan with one or more channels enabled. Confirm the scan data is shown in a display panel and click on that display panel to ensure it has keyboard focus.
Next, select the type of data you wish to acquire, spectra or images, using the menu at the top right of the Spectrum Imaging / 4D Scan Acquisition panel.
You can perform synchronized acquisition on the full scan, a sub-area rectangle (possibly rotated), or on a line.
Full Context Synchronized Acquisition
To perform a full scan, click on the context image and make sure no graphics are selected. Enter the desired scan width in the Spectrum Imaging / 4D Scan Acquisition panel, check the acquisition estimated time and size, and click Acquire. The context image will update during the acquisition process.
Sub Area (Rectangle) Synchronized Acquisition
To perform a rectangle scan, add a rectangle graphic to the context image (a quick way to do this is click on the Subscan Enabled in the Scan Control panel). Adjust the rectangle by dragging and adjust its rotation using the inspector. Now enter the desired scan width in the Spectrum Imaging / 4D Scan Acquisition panel, check the acquisition estimated time and size, and click Acquire. The subscan image will update during the acquisition process. If the subscan image is not visible, make it visible by right clicking in an empty display panel and choosing the desired channel with “Subscan” in its title.
Line Scan Synchronized Acquisition
To perform a line scan, add a line graphic to the context image. After adjusting its position, enter the desired scan width in the Spectrum Imaging / 4D Scan Acquisition panel, check the acquisition estimated time and size, and click Acquire. The subscan image will update during the acquisition process. If the subscan image is not visible, make it visible by right clicking in an empty display panel and choosing the desired channel with “Subscan” in its title.
The resulting data will be a collection (one dimension) of your selected data type (spectra or image). You can display the data in its default mode (a spectra or an image) and scroll through the collection using the Ctrl-Right-Arrow and Ctrl-Left-Arrow keys. Or you can use the menu item Processing > Redimension Data > Redimension to a Collection of 1 Image of Shape 400x2048 or similar to display an image with a collection index on one axis and the data dimension (energy) on the other axis.
Using the Multi-Acquire Panel
This plugin allows you to acquire series of images/spectra or whole synchronized scans with multiple offsets and exposure settings.
Main window
Get the plug-in main window by selecting it from the “Window” menu.
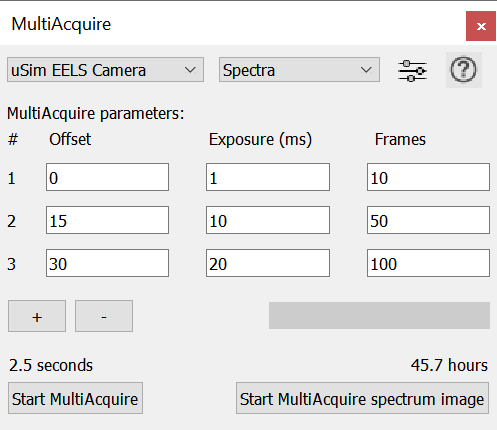
The acquisitions can be set up with the table in the main window. Each returned data item corresponds to one line in the configuration table. Use the “+” and “-” buttons to add or remove lines. The first column shows the data item number, which will also be added to the titles of the results. You have the option to acquire the programmed sequence as individual spectra/images or as spectrum images/4D images by clicking either on Start MultiAcquire or Start MultiAcquire spectrum image. Note that for individual spectra/images, the progress bar will only update once per line in the configuration table (i.e. if only one spectrum is defined it will jump straight from 0 to 100%). For spectrum images/4D images, the progress bar will update once per acquired line of a spectrum image. The left dropdown menu at the top of the main window lets you select the camera that is used to acquire the data. The right dropdown menu lets you select between different output styles for the acquired data:
Spectra: Bins the camera frames in y-direction which results in spectra or spectrum images being returned.
Images: Returns the full camera frames which results in images or 4D data sets being returned.
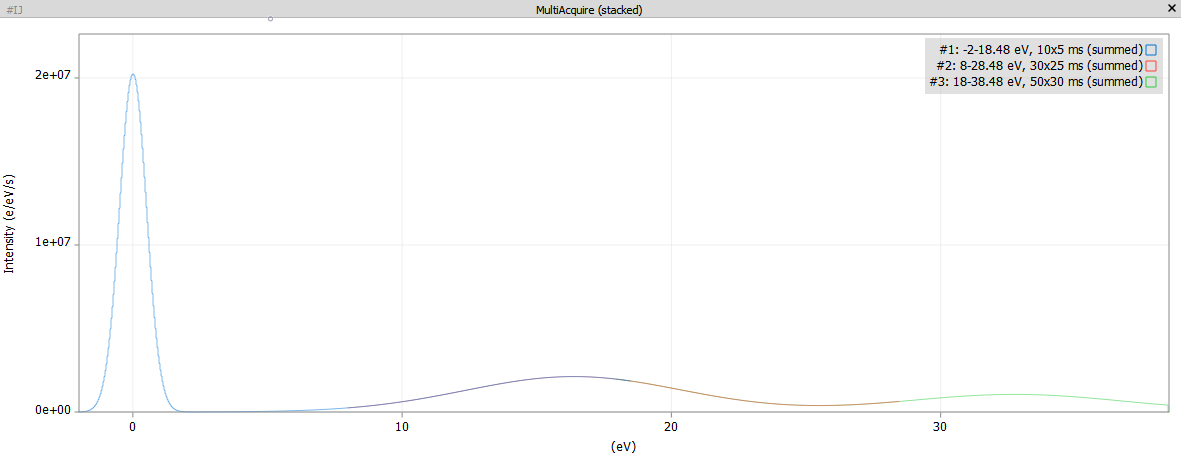
MultiEELS Spectra: Also bins the camera frames in y-direction but additionally calibrates the returned data in e-/eV/s. If you are not acquiring a spectrum image, this mode will also create one additional data item that contains all acquired spectra as multiple line plots (see image below for an example).
Virtual Detectors (Only available if the selected camera supports this mode.): Multiplies all camera frames with a mask and sums them. This will result in an image with only one value per virtual detector and scan pixel. This mode can only be used for acquiring synchronized scans.
The plug-in will always create one result data item per line in the configuration table. If frames is larger than 1, the corresponding result data item will be a stack of the data type that is configured via the dropdown menu.
Settings Window
You can access the settings menu via the button in the top-right corner of the main window.
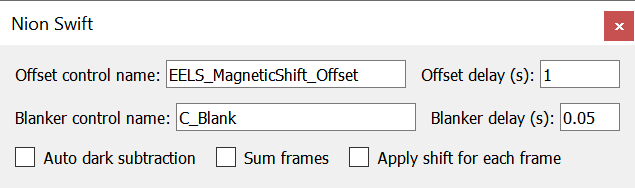
In order to set the offsets, the plugin needs to know which control it has to change in AS2. Type the name of this control into the Offset control name field. If the field is empty, offsets are disabled, regardless of what is configured in the main window.
The checkboxes in the bottom row allow you to configure how the data will be returned:
Auto dark subtraction will blank the beam after the acquisition is finished and repeat it (with the exact same settings). This data will be then be used as dark images for the actual data. Make sure Blanker control name is set correctly, otherwise this mode will fail. Note that this settings has no effect for spectrum images as it will always be deactivated in this mode.
Sum frames will sum all frames that were acquired for each spectrum (as specified by the column frames in the main window). If this is off, the plug-in will return a stack for each spectrum.
Apply shift for each frame will shift each frame in a synchronized acquisition by the amount specified in the main window (“Offset” field). Note that when this setting is active, the first frame of the sequence will not be shifted. So if you set “Offset” to “1” and “Frames” to “3” the first frame will not be shifted, the second will be shifted by “1” and the third frame will be shifted by “2”. If you add another line of spectrum parameters in the main window, the first frame in the second line will be shifted by the same amount than the last frame of the previous line. So starting with the example here, the first frame of the second parameters line would also be shifted by “2”. If “Offset” for the second line is “-1” and “Frames” is also “3”, the second frame would be shifted by “1” and the third frame of the second line would be shifted by “0” again. This behavior allows to implement acquisition patterns that move back and forth between two end points.
Using the Multiple Shift Acquire Panel
This plugin allows you to acquire a stack of spectra with energy offsets between each frame. A spectrum stack of a chosen number of frames can be acquired, have the dark reference subtracted, and then be aligned through automatic cross-correlation and summed. The integration time for each frame is taken from the current set-up for the camera. The plug-in returns a spectrum stack, the aligned and summed spectra, and a line profile over a cropped region of the aligned and summed spectra.
Main Window
The main control panel for the plug-in can be found in the “Window” menu.
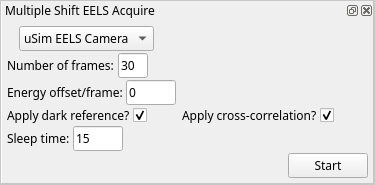
The control panel allows the following options for the user:
Dropdown menu: The camera to use for the stack acquisition is chosen by the drop-down menu (in the image shown, “uSim EELS Camera” is chosen).
Number of frames: allows the user to choose the number of frames to acquire and sum by entering a positive integer into the textbox.
Energy offset/frame allows the user to enter a number (integer or decimal) in the “Energy offset/frame” textbox: each successive spectrum will be offset by the input value in eV. If 0, no energy offset will be applied and the camera will not pause between acquisitions.
Apply dark reference? allows the user to choose whether or not a dark reference should be applied to the acquired spectra. If the box is ticked, the program will blank the beam, pause (for sleep time) to let the afterglow die down, and then acquire and apply a dark reference with the same camera settings. If the box is not ticked, no dark reference will be applied to the acquired data (for example, this might be desirable in order to characterize the detector response).
Apply cross-correlation? is a checkbox that allows the user to choose whether or not the spectrum stack will be aligned before summing. If the box is ticked, the cross-correlation of each spectrum will be calculated relative to the first spectrum, and the stack will be aligned and then summed. If the box is not ticked, no cross-correlation will be calculated and the stack will not be aligned before summing.
Sleep time allows the user to enter a positive number. If a dark reference is acquired, the detector will pause for this number of seconds after blanking the beam and before acquiring dark reference frames. If a non-zero energy offset is given, this value also represents the time-out for confirmation from the detector that an energy shift has been applied.